
Setting up your studio monitors correctly is essential for achieving accurate sound reproduction and an optimal mixing environment. Poor placement can cause unwanted reflections, uneven frequency response, and an inaccurate stereo image. Follow these key guidelines to ensure your monitors are positioned for the best possible sound quality.
1. Establish the Listening Position
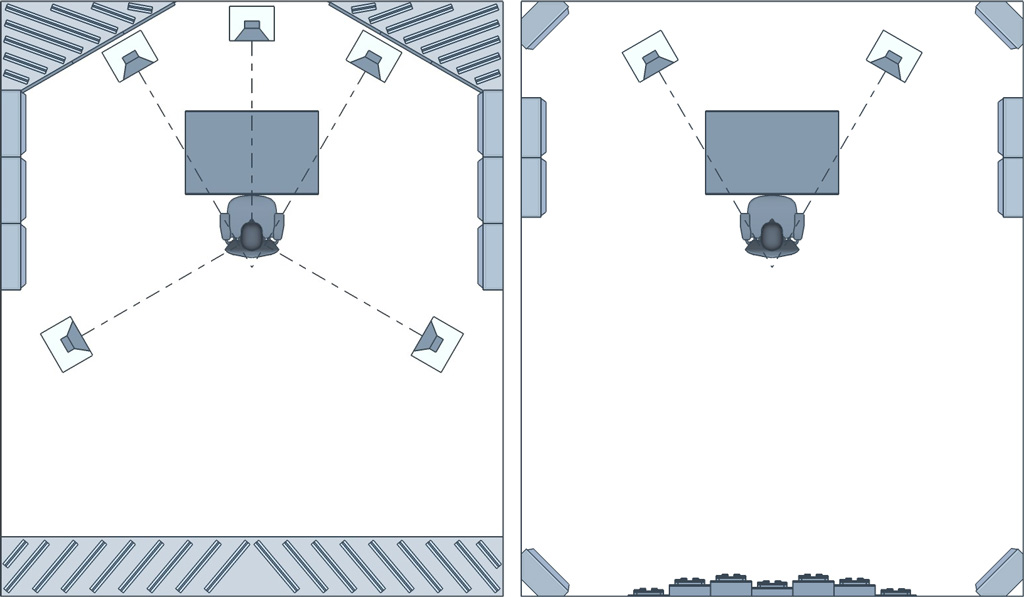
Begin by determining your primary listening position, often referred to as the “sweet spot.” This is where you’ll spend most of your time mixing and monitoring audio. Ideally, your seat should be positioned along the room’s centerline, facing the shorter wall. This orientation helps in achieving a balanced stereo image and minimizes acoustic issues.
2. Form an Equilateral Triangle

For accurate stereo imaging, position your monitors and listening position to form an equilateral triangle:
- Monitor Distance: The distance between the two monitors should be equal to the distance from each monitor to your listening position.
- Angle (Toe-In): Angle each monitor inward so that they point directly at your ears, typically forming a 30-degree angle with the listening position.
This setup ensures that sound from both monitors reaches your ears simultaneously, providing a clear and precise stereo image.
3. Adjust Monitor Height
The tweeters of your monitors should be at ear level when you’re seated. This alignment ensures that high frequencies are directed straight toward you, offering the most accurate frequency response. If necessary, use adjustable stands or isolation pads to achieve the correct height.
4. Maintain Proper Distance from Walls

Monitors placed too close to walls can cause bass frequencies to become exaggerated due to reflections. To mitigate this:
- Rear-Ported Monitors: Maintain a distance of at least 1 to 2 feet (30–60 cm) from the back wall.
- Front-Ported or Sealed Monitors: While they can be placed closer, it’s still advisable to keep some distance to reduce reflections.
Additionally, ensure monitors are equidistant from side walls to prevent asymmetrical reflections that can skew the stereo image.
5. Use Isolation Pads or Stands
Placing monitors directly on a desk can lead to unwanted vibrations and reflections. To prevent this, use isolation pads or dedicated monitor stands. These accessories decouple the monitors from surfaces, reducing resonance and providing a clearer sound.
6. Address Room Acoustics
Even with perfect monitor placement, room acoustics play a significant role in sound quality. Consider implementing:
- Bass Traps: Placed in corners to absorb low-frequency buildup.
- Acoustic Panels: Positioned at first reflection points on walls and ceilings to absorb mid and high frequencies.
- Diffusers: Used to scatter sound waves, preventing flutter echoes and standing waves.
These treatments help in creating a more neutral listening environment.
7. Test and Adjust After setting up your monitors:
- Play Reference Tracks: Use well-mixed songs to evaluate the sound quality.
- Listen for Imbalances: Pay attention to any frequency exaggerations or nulls. Make
- Incremental Adjustments: Slightly move monitors or adjust angles as needed to achieve the best sound.
Remember, small changes can have significant impacts on sound quality.


